7/30/13

Bananas Foster Milkshake Recipe

Bananas Foster Milkshake recipe, if you love your flambe bananas foster desert you are going to love the same version but in a thick and rich milkshake! Flames and all!
Hola Amigos! You all know how much I am in love with chocolate, but I think I've just found the second best thing in life (well at least for this week). Bananas Foster!!! Oh goodness...that is the most decadent dessert not involved with chocolate in the planet...just think about it...buttery, fruity sweet, cinnamony spiced and spiked??? Oh Mama!!! lol...Well you know me...it had to be taken to the next level on  a milkshake!
This was fun to make but even tastier to drink! It has all the components of the bananas foster you love! Even the flaming part believe it or not! Banana Rum, Brown Sugar, Tumeric among other goodies!
I love mine topped with a few banana chips and sprinkle some extra sugar on top, and let's not forget cinnamon sugar in the rim of your cup just to give it that extra sparkle!

Bananas Foster Milkshake recipe, this is a thick rich milkshake with all the components of your favorite desert, flames and all! If you like your dessert you are going to love this milkshake!
Too good to have just one I tell you guys, but we better because it's rich, like your triple thick 'restaurant" milkshake, only way better! 
Thank You so much for your visit today, before I forget you can make this kid friendly by skipping the ingredient that makes the bananas "flame"! It will still be delicious! Remember everything tastes better with your imagination and a Pinch of Love!
Besitos,
Lizy

Bananas Foster Milkshake
Ingredients
2 Ripe Bananas
4 Tablespoons of Butter
1/4 Cup Brown Sugar
1 shot Banana Rum or any Rum you have
1 TBSP Lemon Juice
Pinch of Cinnamon
Pinch of Tumeric
1/2 Milk
1 Pint Vanilla Ice Cream
1 tsps Vanilla Butter
Cinnamon Sugar for garnish
Banana Chips for garnish
Directions
In a large skillet melt butter and sugar in low-medium heat to avoid burning, stir.
Add the bananas ( I prefer to add them  cut). Cook them for about 4 minutes. 
Very carefully add the rum and with a long match or lighter flambe your banana mix. ***Very important, make sure the vents of the stove are off while you do this, since the flames might shoot. 
Let the flame die down.
Add lemon juice, cinnamon and tumeric, cook for another 2-4 minutes.
Let it cool at room temperature and add to your blender with the milk and ice cream. Blend until smooth and enjoy!

Prep Time: 8 minutes     Cook Time: 8 Minutes     Serves 4 (4oz) Glasses


Sharing some Fiery Spiked Bananas at these Fabulous Parties:
The Lady Behind the CurtainDaisy Cottage DesignsAll She CooksThe Shady PorchMy Girlish WhimsFluster BusterThe Shabby Creek Cottage52 MantelsWhat's Cooking Love?A Handful of EverythingChocolate, Chocolate and MoreLamberts LatelyLive,Laugh,RoweThe Mandatory MoochReal Coake.comPosed PerfectionThe Crafty BlogstalkerConsider Me InspiredKitchen Fun with my 3 SonsSparkles and a StoveMommiFriedSomewhat SimpleMy Turn (for Us)Home Maid SimpleRattlebridge FarmBlissful and DomesticDo Small Things with LoveFrench Country CottageArtsy Fartsy MamaLiving Less Spending LessThe Brambleberry Cottage504 MainThe Pin JunkieJennifer RizzoMy Romantic HomeThis and ThatThe Best Blog RecipesLove and LaundryChic on a ShoestringThe Shabby NestThe Answer is ChocolateTidy MomOne Tough MotherA Simple FiveCraftionaryLiz MarieSimply DesigningBecoming MarthaSimply Sweet HomeLiving Better TogetherThe Jenny EvolutionMy Personal Accent4 Little FergusonsTatertots and JelloCooking with CurlsHappy and Blessed HomeFive Days 5 WaysJust Us FourWhipperberryThe Wondering BrainLovely Crafty HomeDear CreativesDessert Now, Dinner LaterAngel HomesteadClassy ClutterToo Much TimeCheerios and LattesSerenity YouFlamingo ToesLife on Lakeshore DriveThe Foley FamSpatulas on ParadeVMG206Nifty Thrifty ThingsRain on a Tin RoofHuckleberry LoveStill Being MollyCupcake-n-BakeThe Princess and her CowboysThe Plaid and Paisley KitchenA Southern Fairy TaleMad in CraftsMaking the World CutterThe Chicken ChickSay Not Sweet AnneMs.enPlaceBoggieBoard CottageI Gotta Try ThatWho Need a CapeThe Blackberry VineLadybug BlessingsOur Home Away from HomePint Sized BakerKathe with an EMandy's Recipe BoxChef in TrainingLove Grows WildHome Stories A to ZNap-Time CreationsSugar Bee CraftsAdventures of a DIY MomFeeding BigHomemade GingerMemories by the MileNot Just a HousewifeA Peek Into my ParadiseSix Sister's Stuff


Other Banana Milkshakes you might like:


7/29/13

Oreo & Cookie Dough Brownies Recipe

Oreo & Cookie Dough Brownies Recipe, these brownies will have you come back for more, Oreo Cookies, Cocoa Butter Spread, White Chocolate M&M's, to name a few of the tasty ingredients.
Hola Amigos! A few days ago looking for tips on how to bake the best brownies and  I found  a lot of good recipes but one site talked about the criteria of a good brownie,  taste, level of difficulty and creativity. I agree, I like my brownies tasty, easy to bake and with a twist. That's how I came up with this recipe, which is nothing but a combination of all the good things I like in a brownie, in just one batch.
I like Original brownies...nothing but chocolate and more chocolate! Heated up with a scoop of vanilla ice cream..yum! My element of creativity, a layer of Trader Joe's Cocoa Almond Spread! I love that stuff...do I dare say, more than Nutella?..please don't hate me now, lol


My hubs likes his frozen, this is his batch, topped with a white chocolate pudding glaze (lots of it) to go along with the white chocolate M&M's in every bite of the brownie!


The kids like their with the works, and I mean "the works" mini oreos, melted chocolate and caramel and more M&M goodness! Pass the milk!

Oreo & Cookie Dough Brownies Recipe, what is not to love about a brownie with cookie dough, cocoa butter spread and white chocolate M&M's to name a few of it's ingredients! Delicious!

So as you can see..you can make your whole family happy with only one batch of brownies by adding a few ingredients and a Pinch of Love,  turning your everyday brownie into the best brownies ever!

Besitos,
Lizy

Oreo Cookie Dough Brownies
Ingredients
1 Box (18oz) Ghirardelli Triple Fudge Brownie Mix
1 1/2 Pound Chocolate chip Cookie Dough
1/2 Cup Almond Cocoa Butter or Nutella
1 Box (15.3 oz) Oreo Double Stuff Heads and Tails (or your favorite)
For Toppings
Mini Oreo Cookies
Caramel Topping
Philadelphia Dark Chocolate Snack Delights (melted) 
White Chocolate Instant pudding mix
Directions
Preheat oven at 350F. Line a 9x13 pan with parchment paper. Spray with non stick spray or oil. 
Lay your cookie dough on the parchment paper shaping it into the baking pan. 
Spread the Cocoa Butter or Nutella on the cookie dough, this would be the "cement' for the Oreo Cookie rows to come. 
Place Oreo cookies on rows on top of the Cocoa Butter. About 5 per row until your baking pan is covered with the Oreo cookies.
Drop your M&M's trying to fill in the Oreo gaps with the candy. 
Prepare the box brownie mix according to the instructions on the box.
Pour in your mold and bake for 40-45 minutes, until your toothpick comes out clean
Remove from oven and once your brownies have cooled, lift  the entire batch from the pan  by the parchment paper and cut into squares. Decorate and enjoy. 


Prep time:30 minutes    Baking time: 40-45 minutes (or baking time in your brownie mix box)  
Serving 16-30


Sharing a Batch of Oreo Cookie Dough Brownies at these Fabulous Parties:
The Princess and her CowboysI Gotta Try ThatBetween Naps on the PorchWho Needs a CapeCreative BlogLove Grows WildMandy's Recipe BoxNap-Time CreationsHome Stories A to ZPint Sized BakerAdventures of a DIY MomSugar Bee CraftsOur Home Away from HomeThe Blackberry VineFeeding BigChef in TrainingLove Bakes Good CakesHomemade GingerSmart School HouseMade to be a MommaDucks'n a RowDaisy Cottage DesignsAll She CooksThe Lady Behind the CurtainThe Shady PorchMy Girlish WhimsHandy Man, Crafty WomanFluster BusterThe Shabby Creek Cottage52 MantelsWhat's Cooking Love?A Handful of EverythingChocolate, Chocolate and MoreLamberts LatelyLive,Laugh,RoweDesigned DecorThe Mandatory MoochReal Coake,comPosed PerfectionThe Crafty BlogstalkerConsider Me InspiredKitchen Fun with my 3 SonsSparkles and a StoveMommiFriedSomewhat SimpleMy Turn (for Us)Home Maid SimpleRattlebridge FarmBlissful and DomesticDo Small Things with LoveFrench Country CottageArtsy Fartsy MamaLiving Well Spending LessThe Brambleberry Cottage504 MainThe Pin JunkieThe Pin JunkieMy Romantic HomeThis and ThatThe Best Blog RecipesLove and LaundryChic on a ShoestringThe Shabby NestThe Answer is ChocolateTidy MomOne Tough MotherA Simple FiveCraftionaryLiz MarieSimply DesigningBecoming MarthaSimply Sweet HomeLiving Better TogetherThe jenny EvolutionMy Personal AccentKrafty Card Set4 Little FergusonsTatertots and JelloCooking with CurlsHappy and Blessed HomeFive Days 5 WaysJust Us FourWhipperberryLydia's Flexitarian KitchenThe Wondering BrainLovely Crafty HomeDear CreativesDessert Now, Dinner LaterAngel HomesteadSerenity YouCheerios and LattesToo Much TimeClassy ClutterFlamingo ToesLife on Lakeshore DriveSuburbs MamaThe Foley FamTwigg StudiosSpatulas on ParadeVMG206Nifty Thrifty ThingsRain on a Tin RoofHuckleberry LoveCupcake-n-BakeThe Plaid and Paisley KitchenA Southern FairytaleMad in CraftsMaking the World CutterSay Not Sweet AnneMs.enPlaceBoggieBoard CottageKitchen Meets GirlLe Chateau des FleursSix Sister's StuffThe Stylist Quo


Other Brownie Recipes you Might Like

7/25/13

Recycled DIY Tide Pods Fish Lamp

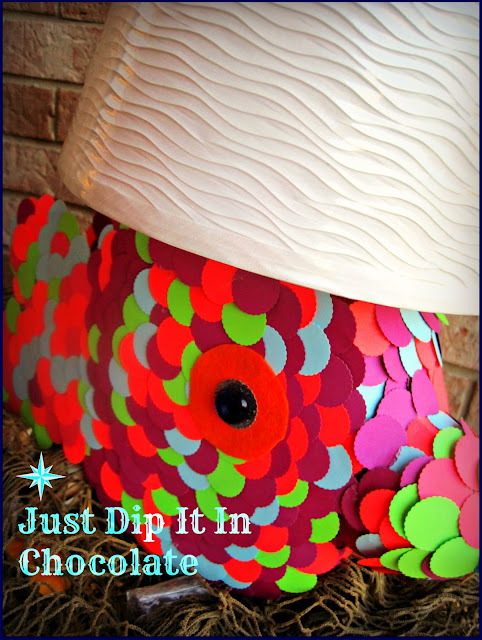
DIY Tide Pods Fish Lamp, don't throw your container away just yet, transform it into a whimsical lamp for just a few bucks and your imagination. Great Kids Project with a bit of mom's help!
Hola Amigos! A container of Tide Pods has been staring at me for a while now. I just hate throwing away something that it could be repurposed into a useful object...well at least in my head that is, lol. It finally hit me one night after reading again, one of my little one's favorite book The Rainbow Fish! At that moment I was a mad woman trying to put things together before the inspiration left me again..one problem...very few if not any pictures of the process of creating my master piece...but it's so simple you will be able to figure it out at first glance!
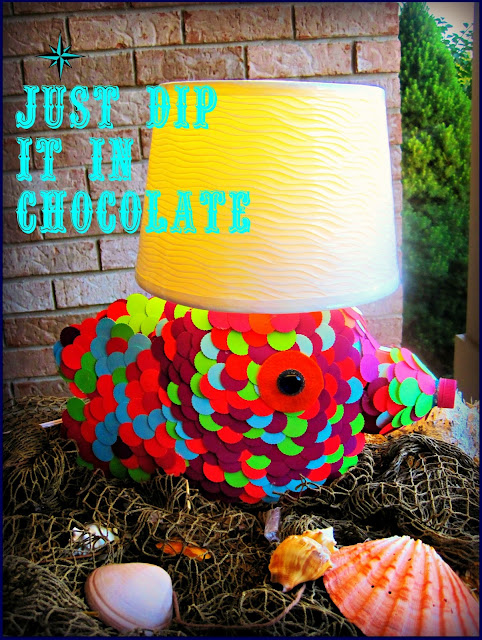
DIY Tide Pods Fish Lamp. a clever way to re-purpose that old container and make something whimsical and useful. Great for kids's rooms and a project they can help create with a little of mom's help.

What I used: 1 Tide Pod container, 1 Martha Stewart Circle Punch Cutter, Assorted Craft Paper, 1 medium size Cardboard,  Hot glue Gun sticks (lots of them) , 1 Empty Plastic Water bottle cut in half, felt, 2 glass beads 1 lamp kit from the hardware store 1 Lamp Shade.
How I did it: I cut a couple hundred circles with the circle cutter and glue them to the tide container to create the scales and  body of the fish. For the Tail Fins I drew 2 semi hearts out of  cardboard and then glue more paper circles to it until they were covered. I glued them to a side of the container. To make the fish mouth I used the top part of the water bottle and attached it to the other side of the container opposite to the tail fins. left the lid on because I thought it looked cute. My hubs drilled a hole on the top of the tide container (lid) and  adapted the lamp kit to it after that he opened another on the bottom to let the cable out. Cut 2 pieces of felt of a contrasting color and make 2 circles to represent the eyes 1 for each side of the container. Use to glass beads to create the "watery effect' of the eye.  Your lamp should be working now!


 I am happy with the results ..and before I forget the lamp shade was on sale at Target for 60% off , I love it has a wavy pattern, just like the ocean. Basically the total cost of this  lamp was about $12 dollars! not bad huh?
DIY Tide Pods Fish Lamp, for only a few dollars create this whimsical lamp with that empty container! Great kid's project with a little of mom's help.

I think my rainbow fish have some personality don't you think? I mean...for a fish that is!

As nighttime begins to fall, we need to move "Rainbow" to it's permanent location
Recycled DIY Tide Pods Container Lamp, great kids room decor with something you have in your laundry room! Great craft project for kids with a little help from mom

   My Little Boy's Room, which by the way is all Ocean and Beach Motif
He is happy and mama is happy to ( I finally got something good out of that container now I finally can move on to those milk jugs waiting to be transformed, lol) 
Thank you for your kind visit. Look around for things you do everyday for inspiration in creating beauty and whimsy around you, we all need to smile more often and worry less!
Recycled DIY Tide Pods Fish Lamp. A crafty way to recycle that old container sitting in your laundry room! Great kids project with a little help from Mom

Good Night Rainbow Fish!
Besitos,
Lizy

Sharing Good Night "Fishy" Wishes at these Fabulous Parties:
The Best Blog RecipesCraftionaryNaptime CraftersKitchen Fun with my 3 SonsThe Answer is ChocolateLiving Better TogetherThe Jenny EvolutionBecoming MarthaHappy Hour Projects,
Tooted in ThymeOne Tough MotherTidy Mom504 MainThe Pin JunkieMy Turn (for Us)Love and LaundryHappy and Blessed HomeThe Wondering BrainLovely Crafty BlogA Little ClaireificationHomemade Ginger4 Little Fergusons30 Handmade DaysFive Days 5 WaysSew;Licious Home DecorAngels HomesteadBe Different Act NormalToo Much Time on my HandsCheerios and LattesIt's OverflowingSerenity YouMama GabLife on Lakeshore DriveBowdabraCooking for the Seven DwarfsTiti CraftyWCFSCrate with JoyFrugal Foodie MamaClaire Justine oxoxUncommon DesignsAlderberry HillBoogieBoard CottageFlour Me with LoveKeeping it SimpleSew Can DoCupcake-n-BakeJembellishJam HandsSumo's Sweet StuffThe Chicken ChickCraft-o-ManiacHuckleberry LoveUnder the Table and DreamingThe Plaid and Paisley KitchenThe Princess and her CowboysI Gotta Try ThatBetween Naps on the PorchWho Needs a CapeLove Grows WildTodays Creative BlogNap-Time CreationsHome Stories A to ZAdventures of a DIY MomSugar Bee CraftsOur Home Away from HomeThe Blackberry VineFeeding BigChef in TrainingLove Bakes Good CakesHomemade GingerSmart School HouseMade to be a MommaDucks'n a RowDaisy Cottage DesignsThe Lady Behind the CurtainMy Girlish WhimsHandy Man, Crafty WomanFluster BusterThe Shabby Creek Cottage52 Mantels,What's Cooking Love?A Handful of EverythingChocolate, Chocolate and MoreLamberts LatelyLive,Laugh,RoweDesigned DecorThe Mandatory MoochReal Coake.comPosed PerfectionThe Crafty BlogstalkerConsider Me InspiredSparkles and a StoveMommiFriedSomewhat SimpleFrench Country CottageArtsy Fartsy MamaLiving Well Spending LessThe Brambleberry Cottagethe Shabby NestA Simple FiveMy Personal AccentKrafty Card SetTatertots and JelloLydia's Flexitarian KitchenDear CreativesClassy ClutterDebbiedoo'sThe Taylor HouseSuburbs MamaThe Foley FamTwigg StudiosMama DishPowerful MotheringDragonfly DesignsHouse of HepworthsMy Joy Filled LifeFood Done LightFun-A-DayDIY Vintage Chic


Other DYI Lamps You Might Like:


7/24/13

Easy Ravioli Lasagna Recipe

EAsy Ravioli Lasgana, no time to cook noodles, no problem use frozen ravioli and have the ultimate lasagna in no time. It's delicious and you can customize it by changing the flavors of the ravioli! Yum!
Hola Amigos! Once in a while we all deserve a break from the kitchen, take a few shortcuts but at the same achieve great and delicious results. This is that kind of recipe. Using frozen ravioli of any kind you would be able to create this lasagna in no time and great taste. 
It freezes wonderfully so you will probably want to  bake 2 and freeze 1 for another lazy day.
You put together your lasagna the same way you would a regular one.  Cover it up, bake and enjoy!


You know you have done a great job when you can cut your lasagna and see all the layers you carefully put together come out so pretty!
Easy Ravioli Lasagna when you have no time to cook use frozen ravioli to make it! Customize it your way by changing the flavors of the ravioli! Delicious, Fast the perfect Freezer Meal

No one can complain there is not enough cheese on this lasagna! Add more veggies to yours by using spinach raviolis instead. Delicious!


Serve it with garlic bread or a green salad. This one is a main dish in itself
Here is the recipe for you friends. Enjoy and remember everything tastes better with a Pinch of Love
Besitos,
Lizy

Ravioli Lasagna Recipe
Ingredients
1 Pound Ground Beef
1 Jar (28 oz) You Favorite Spaghetti Sauce
1 1/2 Package (250z) Frozen Ravioli Cheese, Beef, Spinach, your choice
1  Cup Bechamel Sauce
1 (8oz ) Can Sliced Mushrooms (optional)
1 1/2 Cup Shredded Italian Cheese
Directions
In a large pan, over medium heat, brown beef until no longer pink. Add Spaghetti Sauce and season if necessary. 
Using a 9"x13" lasagna baking dish, layer a 1/3 of the beef sauce, half of the ravioli (frozen or cooked), bechamel sauce, mushrooms and half of the mix of Italian Cheeses. Repeat 1 more layer of ravioli, beef sauce and finish with the rest of the cheese.
Cover and bake in a 365 F oven for 40-45 minutes or until heated up.

Prep Time 30 minutes   Cooking Time 40-45 minutes  Servings 6-8 

Easy Ravioli Lasgna, Easy and quick meal with only a few ingredients but pack with flavor. Change the raviolis to cheese, beef, spinach and have a different meal every time. Perfect Freezer Meal

Sharing my Lazy Recipe at these Fabulous Parties:
Life with the Crust Cut OffThe Shaffer SistersRose Chintz CottageThe Trendy Tree HouseThe Mandatory MoochReal Coake.comThe Crafty Blog StalkerLive Laugh Rowe52 MantelsSaving 4 SixHouse of HepworthsSew Crafty AngelA Handful Of EverythingLiving Well, Spending LessConsider me InspiredArtsy Fartsy MamaThe Best Blog RecipesCraftionaryNaptime CraftersKitchen Fun with my 3 SonsThe Answer is ChocolateLiving Better TogetherThe Jenny EvolutionBecoming MarthaHappy Hour ProjectsRooted in ThymeHome Maid SimpleOne Tough MotherTidy Mom504 MainThe Pin JunkieMy Turn (for Us)Love and LaundryHappy and Blessed HomeChef Picky Kid and MeRattlebridge FarmThe Wondering BrainLovely Crafty BlogA Little ClaireificationHomemade Ginger4 Little Fergusons30 Handmade days, Five Days 5 WaysDessert Now, Dinner LaterSew-Licious Home Decor4 You with LoveAngels HomesteadBe Different Act NormalToo Much Time on my HandsCheerios and LattesIt's OverflowingSerenity YouMama GabSpatulas on ParadeLife on Lakeshore DriveBowdabraCooking for the Seven DwarfsTiti CraftyWCFSCreate with JoyFrugal Foodie MamaClaire Justine oxoxUncommon DesignsAlderberry HillBoogieBoard CottageFlour Me with LoveKeeping It SimpleSew Can DoCupcake-n-bakeJembellishJam HandsSumo's Sweet StuffThe Chicken ChickCraft-o-ManiacHuckleberry LoveUnder the Table and DreamingMs. enPlaceThe Plaid and Paisley KitchenThe Princess and her CowboysI Gotta Try ThatBetween Naps on the PorchWho Needs a CapeLove Grows WildMandy's Recipe BoxNap-Time CreationsHome Stories A to ZPint Sized BakerAdventures of a DIY MomSugar Bee CraftsOur Home Away from HomeThe Blackberry VineFeeding BigChef in TrainingLove Bakes Good CakesHomemade GingerSmart School House,


7/22/13

Butterscotch Banana Harvest Cake with Apple Butter Maple Sauce Recipe

Butterscotch Banana Harvest Cake with Apple Butter Sauce, this cake is full of the typical flavors of fall, butterscotch, apples, maple syrup, apple butter and cinnamon, but with the addition of the banana you can have it all year long!
Hola Amigos! Happy to have you join me and share a piece of this gooey cake with me! As you can see, I'm getting better with the "bundt' pan and so far no other accidents.
I have a hard time giving this cake a name..why..because it's really put together with all the things I love other than chocolate. It reminds me of fall because of some of the ingredients but you could actually have it all year long! It's good anytime and with everything.  Here is the recipe:
Butterscotch Banana Harvest Cake with Maple Apple Butter Sauce
1 Box Yellow Cake
1 box (3.5 oz)  Butterscotch Instant Pudding
1 (6 oz) Container Banana Yogurt
2 Ripened Bananas, Pureed 
1/2 Cup Butterscotch Chips 
Banana Chips for garnish (optional)
Heat you oven at 350 F or according box instructions. As a suggestion, substitute the amount of water called in the recipe for apple juice. Mix ingredients called on the box until moistened. Add yogurt, pudding and bananas. Mix for about 2 minutes as called in the recipe. Fold in the Butterscotch chips and bake according to the box instructions.
Garnish with Banana Chips and drizzle with Mapple Applebutter Sauce
 Apple Butter Maple  Sauce
Butterscotch Banana Harvest Cake and Apple Butter Sauce, butterscotch, cinnamon, maple syrup, apples and apple butter will bring a new favorite to your fall recipe book...but the banana will keep it perfect to share and celebrate any time of the year! #fall #thanksgivingdesserts #thanksgiving
1 Cup Apple Juice
3/4 Cup Maple syrup
3 TBSP Brown Sugar
1 1/2 Tsp Lemon Juice
1 Cinnamon Stick
3 Tablespoons Apple Butter
3 TBSP Butter
3/4 Cup Butterscotch  Chips 
In a sauce pan on medium heat, add Apple juice, Maple Syrup, brown sugar Lemon and Cinnamon and let this simmer for about 5 minutes without letting in boil. Remove Cinnamon Stick and add Apple Butter and Butter, simmer for another 2 minutes. Finally add the Butterscotch chips and bring to a slow simmer and boil until it thickens enough to coat a spoon. It is not going to be a thick sauce while it's hot, it thickens as it cools. 
Once it has cooled drizzle it liberally on your cake.

Listo,
The cake is delicious even without the Apple Butter Maple Sauce!

So good, my hubs couldn't resist having it sitting there waiting to be photographed and had a slice of it!!!

Needless to say I pretty much took it out of his mouth and send him to "blogger hubby retraining camp" LOL

I figured this would be the perfect cake to welcome the fist days of fall. You can find it's ingredients anytime of the year!

Thank you so much for your kind visit. Let's keep enjoying our summer...after all this cake has a good dose of bananas to take you back to your tropical summer vacation mood with every bite!

Keep in mind my dear friends, everything you do tastes better with a Pinch of Love!
Besitos,
Lizy

Sharing some Harvest Cake at these Fabulous Parties:
The Princess and her CowboysCooking for the Seven DwarfsA Pinch of JoyThe Plaid and Paisley KitchenJam HandsBoogie Board CottageMad in CraftsMaking the World CuterFeeding BigLove Grows WildThe Blackberry VinePint Sized BakerKathe with an ENap-Time CreationsCoastal CharmSugar Bee CraftsToday's Creative BlogMandy's Recipe BoxMy Mixing SpoonI Gotta Try ThatLove Bakes Good CakesCozy Little HouseSmart School HouseThank You HoneyDaisy Cottage DesignsDucks'n a RowThe Lady Behind the CurtainGinger Snap CraftsThe Style SistersTwin Dragonfly DesignsHandy Man, Crafty WomanWorthing CourtLife with the Crust Cut OffRose Chintz CottageTrendy Tree HouseThe Mandatory MoochReal Coake.comThe Crafty Blog StalkerLive Laugh Rowe52 MantelsSaving 4 SixHouse of HepworthsSew Crafty AngelA Handful of EverythingLiving Well, Spending LessArtsy Fartsy MamaConsider Me InspiredThe Best Blog RecipesCraftionaryNaptime CraftersKitchen Fun with my 3 SonsThe Answer is ChocolateLiving Better TogetherThe Jenny EvolutionBecoming MarthaHappy Hour ProjectsRooted in ThymeHome Maid SimpleOne Tough MotherTidy Mom504 MainThe Pin JunkieMy Turn (for Us)Love and LaundryHappy and Blessed HomeChef Picky Kid and MeThe Wondering BrainLovely Crafty BlogA Little ClaireificationHomemade Ginger4 Little Fergusons30 Handmade DaysFive Days 5 WaysDessert Now, Dinner Later4 You with LoveAngles HomesteadBe Different Act NomalToo Much Time on my HandsCheerios and LattesIt's OverflowingSerenity YouMama GabSpatulas on ParadeLife on Lakeshore DriveBowdabraTiti CraftyWCFSCrate with JoyFrugal Foodie MamaClaire Justine oxoxUncommon DesignsAlderberry HillFlour Me with LoveKeeping It SimpleSew Can DoCupcake-n-BakeJembellishSumo's Sweet StuffThe Chicken ChickCraft-o-ManiacHuckleberry LoveUnder the Table and DreamingMs enPlaceMy Romantic HomeI Heart NaptimeAll She CooksSix Sister's StuffEsskunstCheerios and LattesMy Sweet MissionGina's Craft Corner