11/29/12

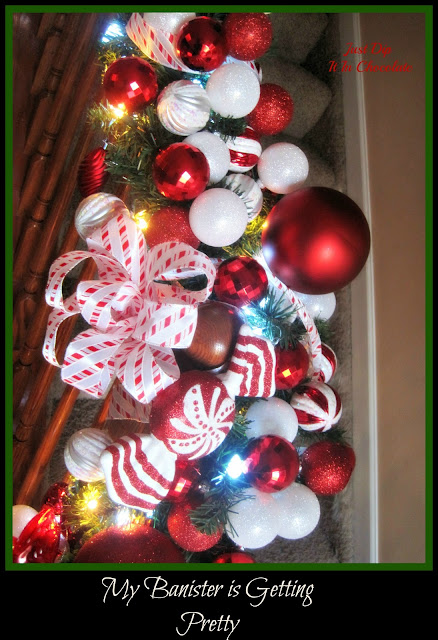
Mi Escalerita=Happy Banister


Do you decorate your stairs and banister? It could be tricky spaces to decorate, not because they are  too big or complicated but because after all is a functional space. I've seen a lot of decorations on Pinterest placed on the steps of the stairs. Even though I think it's very pretty and packs a big visual impact, could you imagine going down stairs for a glass of water and tripping on your luminarias? all the way down??? Yikes...only if you want to spend the Holidays in a full body cast!!!

While on Pinterest, I found the answer to my wishes here! This lady, Joy,  did such an amazing job with her banister. It's inviting, beautiful and elegant!!! Everything on my wish list! I decided to give it a try.


As I told Susan, the lady who writes the wonderful blog where I found the original picture, this was to me a painful labor of love...oh yeah...I think I have a whole new respect for ornament hooks. As I grouped some of the ornaments in sets of 3's wrapping them around the pine wreath was beyond prickly! I stop counting how many times "the hooks" got me after I had every finger of my hand sore and said No More (for that night), lol


Following along with the Candy theme in my home, the colors were selected to resemble peppermints of all shapes and forms.


It turned out to be quite heavy, the Hubs had to help me put it together and making it secure enough for little hands and paws not to knock it down.


I also added peppermint ribbons to give the garland a little more texture.

It took a couple hours of work to finish this little garland, I'm so happy I don't live in one of those palatial homes with endless twisty stairs (sigh).


Here are the stats:
(2 )6 feet wreaths with lights
175 ornaments
20 yards of ribbon
(1) set of left over outdoor white lights with 500 little lights!...yeah 500 give and take a couple burnt out, which I didn't notice  until after they were all wrapped around the garlands (fail oops!)..I don't think you can tell, right?

I hope you enjoy my little project of love and try it on your home. It really brings a nice little glow at night and cheer with bright festive colors at daytime!


Besitos,

11/28/12

Decorating with Christmas Candy

This year we are having a Sweet Christmas theme around the house. From candy canes to chocolate, from tree ornaments to our china...we are trying to sprinkle a little of sugar plum fairy dust in our home this season from our friends and family to enjoy when they visit!
There are lots of great inspiration pictures and projects on Pinterest, for example this cute collection here. I took ideas from several of them and this is how my Sweet Christmas is starting to look like.

Peppermint Wrapped Candle


This was so easy to make and cheap too, I already had the pillar candle and was about to toss it since I thought it was just bulky and plain, good thing I had a change of heart. I headed to the nearest Dollar Tree Store and got myself a couple of boxes of Candy Canes and some Christmas Ribbon and Voila!!! A whole new look for this baby, for about $4.00, can't argue with that!!!


Candy Trees


O.K I'm busy (lazy,lol) 2 kids, 2 crazy kittens, my hubs and a house to take care of, so I really don't have too much free time to hot glue at least a hundred candies to cones, balls, or whatever you wish. I think they look adorable, but I just wish I had the time and patience. Here is my quick fix version of candy trees. Marshmallows acting as snow and the trees, well..candy trees from where else, the Dollar Tree (yeah I can't get out of that place)..Note: the tall trees are from last year, I saved them and just opened them this year.

Decorating with Christmas Candy, make a sweet pine tree forest and bring the scents, and tastes of Christmas home!


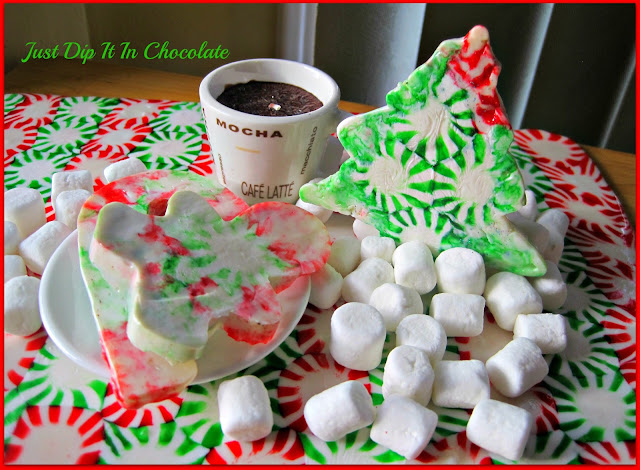
Melted Candy Trays


These trays are hot on Pinterest too, for example this cutie here!. Even though I don't bake, I figured or should I say, convinced myself, that this was just heating up candy on a cookie tray over parchment paper in the oven at 350 degrees for 8 to 10 minutes. Not too bad and fairly easy and super cheap, I only spent $2.00 for the 2 bags of candy from you guessed it, the D.T.


Since it turned out pretty close to perfect (well in my book perfection means not calling the F.D), I decided to try some cookie shape peppermints. I crushed the candies and let heated them up for the same amount of time. They don't look as pretty as the tray, but still they are kind of interesting and fun.


Decorating with Christmas Candy, Nothing says Christmas like the smell of sweet peppermint! make trays and cookies out of these pretty candy in just a couple of minutes

Hope you like my projects today they were fun to make and so far Pinterest has proven  to bea good source of inspirations with easy, quick and cheap ways to decorate for the holiday!

Decorating with Christmas Candy, the sweetest and easiest way to bring some Christmas cheer into your home!

Besitos,
Lizy

Joining this great party:
Who Needs a Cape
Bowdabra
Rate the Plate Utah
The Chicken Chick
A view Along The Way
Savvy Southern Style
Made in a Day

11/26/12

Thai Coconut Curry Shrimp Recipe


Hola Amigos, I hope you had a great weekend among family and friends celebrating Thanksgiving and now are ready to embrace the coming Holidays full of energy and patience! Yes patience as the Holiday Season approaches, we need to arm ourselves with an extra dose just in case someone out of nowhere takes our parking spot that we were waiting on for the last 5 , in case we can't find "the it" toy the store guaranteed it will be in stock when you called earlier, in case you can't find that one bad bulb which is keeping your whole strand of lights in the dark!!!


This week I'm looking over my Pinterest Boards for some inspiration starting with dinner. I think my family had enough turkey for now so I found this delicious recipe for Thai Coconut Curry here at  Group Recipes. I tweaked it a little bit to make it more to our liking and it was a hit! This is my version of the original.


Thai Coconut Curry Shrimp

3 TBS of  Olive Oil or Butter
1 Medium Onion Chopped
2 Cloves of Garlic choppend
3 Tsps of your favorite Curry Spice
1/2 Cup of Water
1/2 Cup Diced of Potatoes and 1/2 Cup of Diced Carrots
1 Pound of Cooked Shrimp (if you prefer uncooked it's ok too)
1 Can Unsweetened coconut milk
1/2 Cup heavy whipping cream
Salt
Parsley or Green Onions
 Pinch of Cinnamon (optional)


In a skillet heat Olive Oil or Butter. Add the Medium Chopped Onion until they start turning transparent. Add the Garlic and cook another minute or two, being careful for it not to burn. To help cooking without adding more fat to the recipe,  you can add a bit of your 1/2 cup of Water as needed.
Add your Curry Spice, Mix and add a bit more water to the mix if it starts getting too lumpy. Cook for about 5 minutes stirring constantly. Remember is important for the mix not to burn


It's time now to add the Can of Coconut  Milk and Diced Potatoes and Carrots. Season the  Mix with Salt to taste and a Pinch of Cinnamon. I diced them very small so they cook faster. Cook at medium heat until vegetables are cooked. If you are in a hurry, by all means use canned vegetables. It will reduce the cook time immensely since you basically would keep it in the stove long enough for the ingredients to heat up.


Once the veggies are cooked, add the Shrimp and the Heavy Whipping Cream, stir until thickened. and remove from heat. Garnish it with Parsley or Green Onions.


Serve over white rice and enjoy. 


Remember, everything tastes better with a Pinch of Love


Besitos,
Lizy

Joining these Fabulous Parties:
Rattlebridge Farm
Dear Emmeline
The Shabby Creek Cottage

11/17/12

DIY Christmas Yule Log" Calendar


If you have ever seen the movie National Lampoon's Christmas Vacation, you probably have an idea of Christmas time at my house. Maybe not all of it (we don't kidnap people in pajamas) but the rest of it, it's pretty much accurate! In particular, The Lights! The Outside is my husband's realm, while I do anything I want inside the house.Sounds like a deal to me, since I don't like to be out in the cold shivering and trying to stay warm.
 Way back in the summer I picked this tree trunk and I've used it to decorate around the house as you can see here.

This Winter Season, our log is going back to the outdoors..at least to our little porch, which will have the only touch of my creativity that I'm allowed to display. And I'm doing this now that is bearable weather wise!
I've created a Calendar of the days left 'till  Christmas. I'm sure I will be asked that question a million times, so what better way for the little one to keep track of them than with a treat calendar that he will get to open on everyday 'till Christmas when he comes back home from pre-school!

Yule Log Days 'till Christmas Calendar

24 little snack cups (mine from The Dollar Tree)
24 little drum tree decorations (mine from the Dollar Tree)
Number stickers of your choice (mine from the Dollar Tree)
Coin Chocolates (mine from the Dollar Tree)
Glitter, your chice of color
Hot Glue, White Glue, craft paper or wrapping paper

First I worked on my cups. I covered them (with my assistant) in white glue, sprinkled some glitter and let them dry.

Then I worked on the lids...I traced I rough circle using the inside of the lid, cut it and trimmed the excess. Once it was centered enough, I glued it using white glue to the top of the lid. Use one little drum per lid and hot glue it to the lid.I pressed it  firmly and lastly  placed the sticker on the face of the drum corresponding to the day.

I repeated the procedure 23 more times , put the treat inside each cup and hot glued them all to the log and Voila!!! Our Yule Log, Buche Noel or Tronco de Navidad was ready!

With a Few Christmas lights, and a friendly Owl left over from Halloween I think it looks quite at home!

 Each Little Snack Box is filled with a Sweet Treat and the best thing is that there was no baking involved!


So why don't you head to the outdoors this Season and use Mother Nature's Treasures in your decorating! It's easy, Free and you can use it over and over again in multiple ways.


Besitos,
Lizy

I will be joining these Fabulous Parties:


11/16/12

Pancho de Nieve=Frank Our Snowman

DIY Snowman Night Light, head over the dollar store near you and with less than $5 you can make this cute night light for the little one in your life. It is a hit, guaranteed! #Christmas #Nightlight #snowman #diykidscraft

This is the story of Francisco aka "Pancho" our snowman...in Northern Lands he goes by Francis aka "Frank"! Unlike other snowmen, Pancho is not cold to the touch but warm and some would say, even cuddlier!

Our Pancho doesn't worries about the sun coming up every morning, about the pesky rabbits trying to reach his carrot nose or the little cold birds trying to set a nest on his hat!

Our Pancho spends his days among Trucks, Cars, Little People, Buzz, Teddy's and his best friend is Curious George! He also thinks everyday of the year is summer time since all the walls are covered in with boats, beach balls, fishes and anemones! He loves it there...but he loves it even more...When Night Time Comes!
Why?...well stick around and you will find out why...In the meantime, let's see how our cuddly friend came to be!


Pancho The SnowMan

2 Fish Bowls one with ruffled edges the other one plain
 (mine are from The Dollar Tree)
1 pair of Men's White  Socks
1 pair of Adult Fuzzy Socks 
(both my socks are from The Dollar Tree)
String of white lights
googly eyes, puffs or buttons and your handy dandy glue gun


This is super easy, take the plain edge bowl and place it inside the ruffled one. You just made Pancho's head (the plain bowl) and body (the ruffled bowl)!!!

Now, we can't leave our friend just like that! Take 1 of your men's white socks and stuff both bowls (ruffled bowl first ) into the sock. the "toes" of the sock will be at the bottom of your Pancho, just like if you were putting on your own socks. Take one of your Adult Fuzzy Socks and stretch it as much as you can..this will become Panncho's scarf. Wrap it around Pancho's neck (where both bowls meet) Take the other sock and  place it on Pancho's head to make his hat. You can tie a rubber band around the excess of the sock (the toe part) to make a pom pom for his hat.


The rest is up to your imagination...eyes, button nose, pom-poms for buttons, flowers for his scarf, you name it give Pancho some personality!

 I found that placing the string of lights inside our friend, would be easier at the end when I had an idea of how he would look like . 
What you do is you poke a hole on the sock in the back of "the neck" and start pushing the lights to the bottom bowl little by little...don't worry about the hole been noticed, the scarf will cover it!
And there you go...your own Pancho!

See how sweet Pancho looks? He is really all Warm and Fuzzy inside...and such a nice glow...he keeps and eye every night on the little boy he shares his room with! he really "Loves the Night Life" When he becomes a star on his own shinning his light on his best's buddy's dreams...until morning comes...
DIY Nightlight Snowman, brighten your way into the holidays with this cute snowman for less than $5! Make one to represent each member of the family and enjoy the soft glow of your Holiday Nightlight! #Christmas #Snowman #diykidscraft #Holiday #dollarstor

Good Night Pancho, Good Night,


Besitos, 
Lizy


11/13/12

Yarn Wrapped Jingle all the Way Christmas Candles

I still recall my huge surprise when I found out that there were some American Soap Operas that have been on air for more than 70 years (Guiding Light was on air for 72)!!!! Yikes...that is a lot of hours sitting in front of your TV. Where I'm from, our "Novelas" last from a month or two or  up to a year, and that is also a long time!

So the question is...what do you do in those intense 60 minutes of drama? Do you concentrate 100% on the passionate twists and turns of the main characters? Do you do a little cleaning hitting rewind or pause button on your DVR, not to miss a minute of affairs gone wrong?  Do you get a little crafty?

With the Holidays only a few weeks away, I chose crafting to get ahead of the game (remote control nearby of course) and do something so simple that I could do with my eyes closed or in this case, my eyes on "Mario" (sighs)

Back to my craft  "Yarn Wrapped Jingle all the Way Christmas Candles"....this is simple and cheap yet in my opinion, quite cute project! You will need only a few supplies and perhaps you already have at least half of all the materials at hand and I can guarantee you, you wont miss one conniving plot while making these little ones!


Yarn Wrapped Jingle All The Way Candles
(2) Dollar Tree Candles or any tall candle you have handy
Yarn, the color of your choice
Jute
Jingles, mine are from the Dollar Tree 
Hot Glue Gun


Place a drop of Hot Glue at the bottom of your candle, that will be your starting point.
From there, let the yarn wrapping begin all around the candle up to about 1/4 of the length of the candle. Cut the yarn and place another dot of glue to keep it from coming apart.Repeat the process this time with your jute, Wrap as high as you want and cut when you decide. Start again with your yarn leaving 1/4 of the candle free of yarn so you can see the glow of the flame through the clear glass.


Once you are done doing this, cut a piece of jute long enough to make a bow. At the end of each side of the bow, attach a jingle using the hoop on it. And you are done!

There you go the first craft of the season and you did it while watching your favorite soap, who says we can't multitask while we relax or...Plot??? hmmmm....


Besitos,
Lizy