Showing posts with label Side Dish. Show all posts

1/21/14

Sweet Plantains with Coca Cola Recipe (Platanos en Tentacion)

Sweet Plantains with Coca-Cola Recipe (Platano en Tentacion) a staple of the Latin American cuisine, plantains are versatile in every stage and color! The darker the sweeter as we prove here with this tasty recipe #plantains #latincuisine #sidedish
Hola Amigos: Today I'm sharing with you an easy recipe to prepare Plantains! I can't get tired of this delicious and versatile fruit! No matter the stage of it's life cycle, it's good! To make this recipe you need to have the plantains as dark skinned as possible, almost black or black! It's o.k. they are not spoiled, they are perfect for this dish!
Dark plantains are easy to find at your grocery store. By the time they are out in the shelves for us to purchase, they are already brownish yellow, after that it takes only a couple of days for them to turn black.

Platanos en Tentacion or Sweet Plantains are an almost mandatory side for all of our meals. Much like fries in America or Tortillas in Mexico, plantains are loved green when they are a salty snack or like in this case, sweet and cooked slowly in butter and sugar, your favorite fruit juice or Coke. When you eat them all the time, variety is important!

A few weeks ago I made a batch to go along with my Rice and Beans with Coconut Milk, perfect together, as every meal needs a little bit of sweetness to make it even better!

If you had plantains before, let me know what's your favorite way to have them! This is just an easy recipe with a a few ingredients for days you want to have something different and tropical as part of your lunch or dinner but not necessarily as a dessert or smoothie. Hope you guys are having a great week! Keep in mind my friends, everything tastes better with a Pinch of Love!

Besitos
Lizy

Sweet Plantains with Coca-Cola
Ingredients:
3  Ripe Plantains
4 TBSP Butter or Margarine
1/2 Cup Brown Sugar
1 Cinnamon Stick
Coca-Cola 
Directions: 
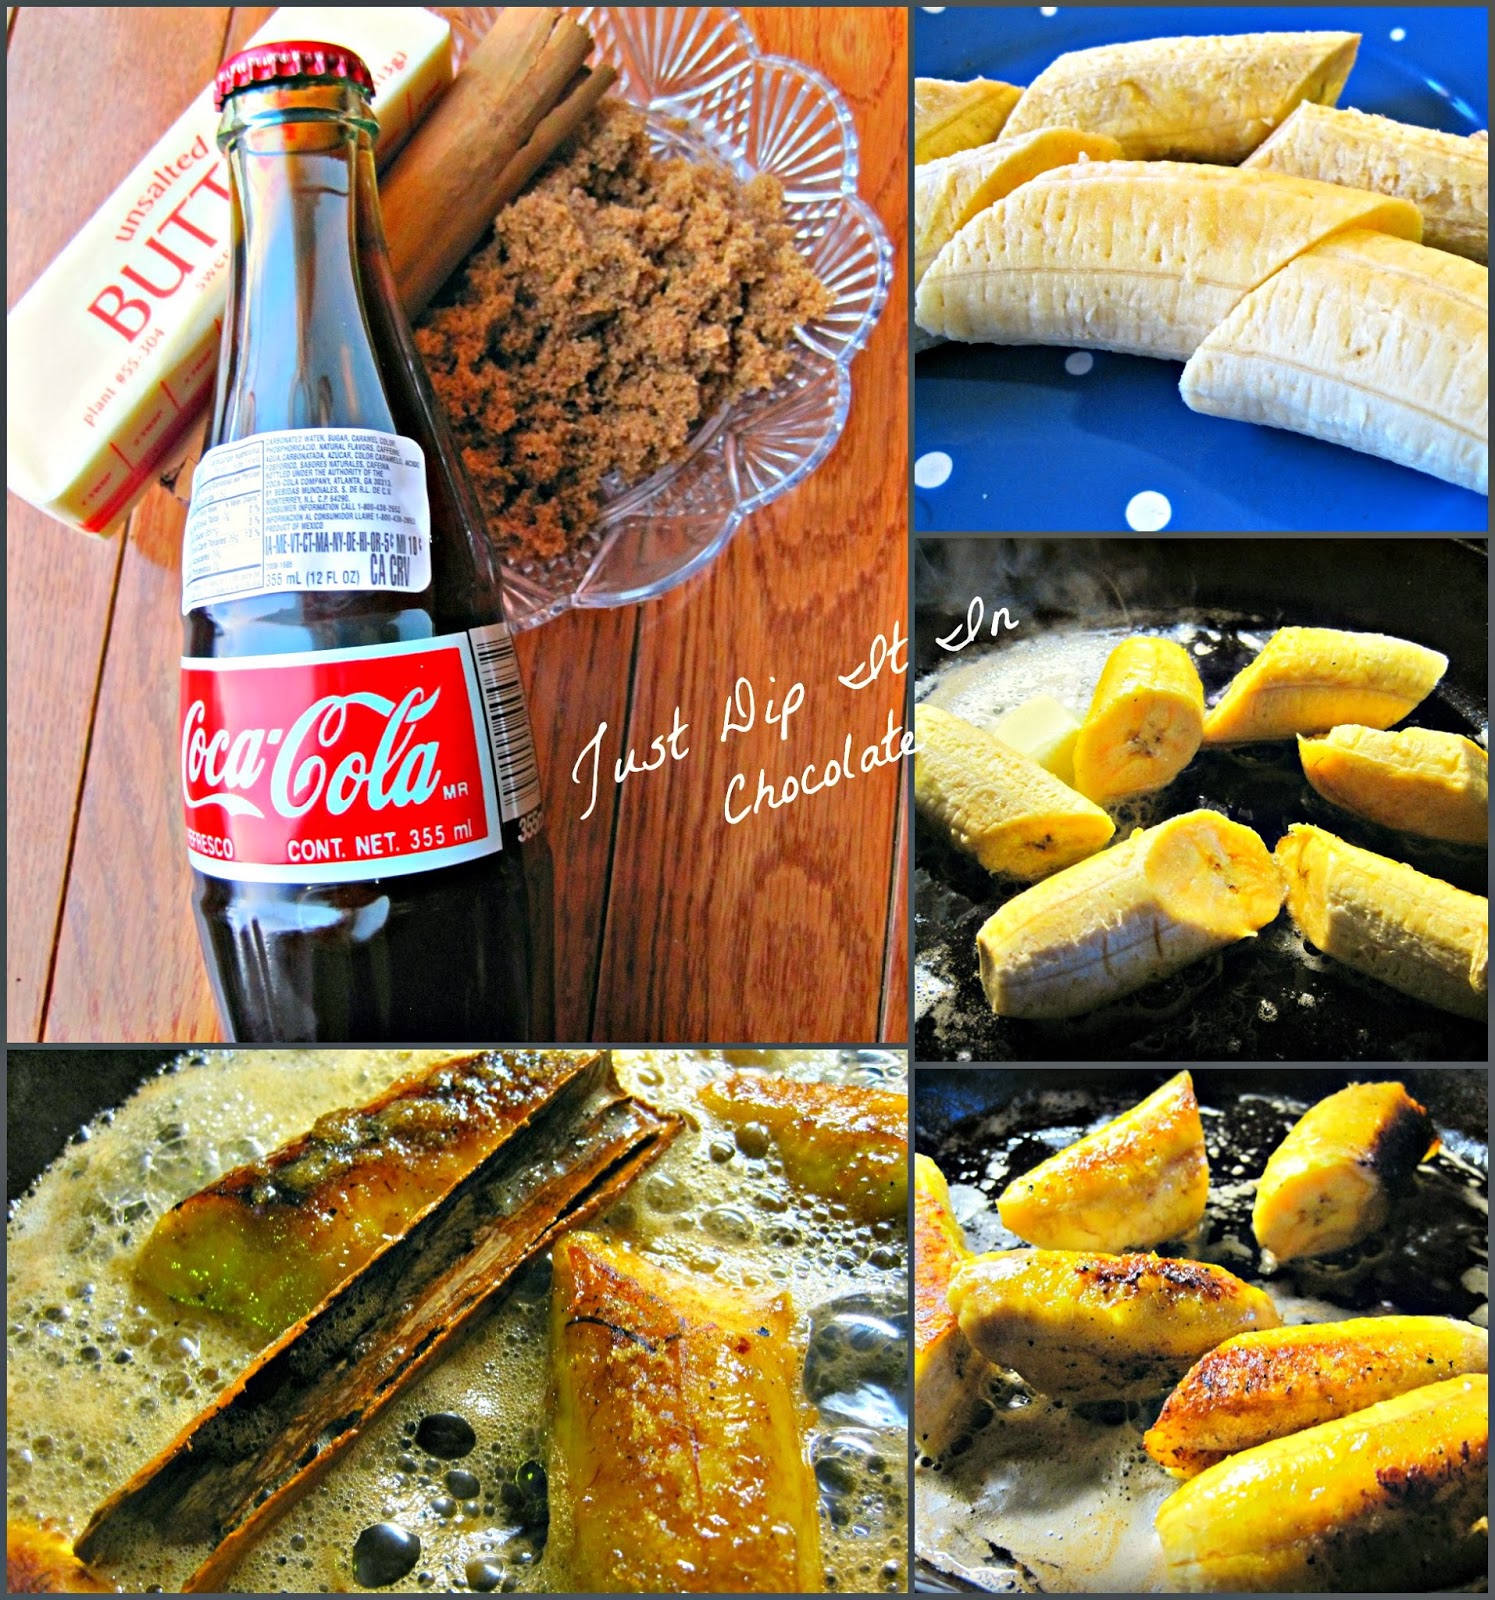
Peel the plantains and cut them in 2"-3" pieces. In a large pan, melt butter and brown the plantain pieces. Add sugar, cinnamon and enough Coca-Cola to cover the plantains. Cook plantains on low heat, covered until they are soft and the sauce has caramelized. About 20-30 minutes. Serve hot. Enjoy!

Sweet Plantains with Coca-Cola Recipe (Platanos en Tentacion) The darker the plantain the sweeter your recipe will be! Don't throw those dark plantains away, delight your family with this tasty side dish typical of the Latin American Cuisine. #plantains #latinfoods #sidedish


Prep and Cook Time :20-30 minutes                                                           Serves  4-6
Sweet Plantains with Coca-Cola Recipe (Platanos en Tentacion) A different way to prepare this humble fruit and a very tasty way to introduce your family to the flavors of the LatinAmerican culture #plantains #sidedish #latinfoods

Sharing my sweet side dish at these Fabulous Parties:

1/13/14

Cheesy Baked Mostaccioli Recipe

Cheesy Baked Mostaccioli Recipe, a classic family dinner main dish or dinner, bake 2 freeze 1 casserole! #mostacciolicasserole #cheese #pastadish #freezermeal
Hola Amigos! After cooking all week, we all feel like taking a break on the weekends, and the best way of doing it (and cheapest) is to cook a casserole big enough to feed an army and tasty and satisfying for your soldiers not to mind reheating leftovers the next day!
Mostaccioli is a favorite. My grandma used to called it Macarrones Asados! She made the most delicious food ever, well I think we all  believe our grandma's are the best at everything anyways, right? I'm sure they are!

I asked my readers on FB how they have theirs, with meat as a main dish or plain as a side, but you know Facebook, No One gets to see what you post there unless a) you have a large fan base b) you pay to promote your status, or c) your  family and friends love you so much they keep up with what you do. I'm blessed and proud to have option C . I got 2 answers, one from my friend +Diane Kaul blogger at Giraffe Legs and she likes it as a main dish with meat in it, delicious and with endless options and the other one from my sweet adoptive little "sis" and blog designer,  Brooke, creative at Uplifted Designs who likes it as a side. Knowing my boys, I decided to play it safe and make a big casserole as a side.
Cheesy Baked Mostaccioli Recipe, we all love mostaccoili, easy to make and keep the family happy with a delicious full of flavor comfort dinner! Bake to freeze 1! #frozenmeals #mostaccioli #pastadish

This is a common recipe, everybody has their own little extra special ingredient and that is what I'm interested on exploring. New possibilities and tastes for a classic!

My motto bake 2 freeze 1 applies to this dish, only don't bake  it after you are done preparing it, freeze it well sealed right away and then bake it for that day you are scratching your head for what to have for dinner!
They all liked it  and I was able to stay out of he kitchen for the weekend a win win situation in my book if you ask me!

Thank You for visiting the blog today! I wish you all a healthy and productive week! Before you leave don't forget to let me know what makes your Mostaccioli extra special and a hit among your family and friends! Big Hug and remember my friends, everything tastes better with a Pinch of Love!
Cheesy Baked Mostaccioli Recipe, the #1 go to #frozenmeal to take over a friends house is she's had a baby, to a family reunion or if you want to have an easy comfort dinner! Bake 2 freeze 1! Delicious! #frozenmeals #pasta #cheesypastadish #mostaccioli

Besitos,
Lizy

Cheesy Baked Mostaccioli 
Ingredients:
2 Cups Uncooked Tube Shaped Pasta
1 Jar (24 oz) Spaghetti Sauce of your choice
1 (10 3/4 oz) Condensed Cheddar Cheese Soup
1/2 Can Milk
1 Large Egg, Beaten
2 Cups Sharp Cheddar Cheese, Shredded (about 16 oz)
1 Cup Cottage Cheese
Pepper. Salt and Garlic Powder to taste
1 Cup Cheddar Cheese "Pringles" Chips, Crushed
1/2 Cup Parmesan Cheese
Directions:
Preheat oven at 350 F.
In a large saucepan prepare your pasta with plenty of salt in the water as indicated on the package. Once drained, place it in a large mixing bowl and start adding ingredients to it mixing after each ingredient is added carefully not to break the pasta. After the last cheese is added, the cottage cheese, check the pasta for flavors and add the condiments, pepper and garlic powder to taste and extra salt if needed.
Pour the mix in 2 separate, previously greased baking dishes. I used (2) 9x9 dishes.
*If you are going to freeze one baking dish, cover the container well and freeze. Remove from freezer, thaw in the refrigerator add the toppings after it thaws and  you are ready to bake it.
Top the remaining baking dish with crushed chips and Parmesan cheese. Bake for 45 minutes. Let it rest and serve with salad, garlic bread and enjoy!

Prep Time 20 minutes                      Cook Time 45 minutes                       Serves 8-12

Sharing my Easy Cheesy Baked Casserole at these Fabulous Parties:

1/3/14

Rice and Beans with Coconut Milk Recipe

Rice and Beans with Coconut Milk Recipe, experience the ultimate Caribbean side dish for excellence! a hint of coconut milk on every bite, not only taste but rich in fiber too! #rice #beans #caribbeanfood #sidedish #coconut
Hola Amigos! I really wanted to make the first post of 2014 memorable! Perhaps an awesome and gooey dessert or a 5 star meal, but after getting and digging a foot of snow the first 2 days of the year and with temperatures today -5 without windchill, the only kind of food I can think of is good old fashion comfort food, nothing fancy, just good!!!!

This rice is very common in the Atlantic Coast of my country. Folks there eat it as part of their daily diet with saucy chicken or spicy escovitch fish! I had mine with a hamburger patty in a spicy onion and mushroom sauce, my 1-2-3  version of Salisbury steak!
Rice and Beans with Coconut Milk Recipe, southern comfort food with a touch of the Caribbean! The perfect side for your fish, friend chicken or patties #beans #rice #coconut #caribbeanfood #comfortfood #southerndish


Add extra beans with butter if you want! I know, not the leanest and healthier thing to eat but it's good I tell ya! On the plus side, it's a side dish rich in fiber!
Rice and Beans with Coconut Milk Recipe, rice never tasted better than this Southern Classic dish with a Caribbean hint! #comfortfood #southernfood #caribbeanfood #rice #beans #coconut

You can taste the sweetness of the coconut on every bite but by no means the rice is sweet, just a hint!
As a side, serve it with something definitely sweet, yellow plantains, mine I soaked in coke, that's why they are a bit on the dark side.


Now that we all had a taste of the sunny Caribbean, let's go out and do some more shoveling! (hopefully not)! I hope you guys are having a wonderful first week of the year! Remember that everything could be memorable and taste even better with a Pinch of Love!
Rice and Beans with Coconut Milk Recipe, an easy and tasty recipe for a Southern favorite with a hint of Caribbean taste! #Southernfood #Caribbeanfood #rice #beans #coconut #comfortfood

Besitos,
Lizy

Rice and Beans with Coconut Milk Recipes
Ingredients
1 1/2 Cup Long Grain White Rice
1 Can Coconut Milk
2 Cups Chicken Broth
1 Can Red Beans, drained
1 Can Pinto Beans, drained
1 Chicken Bullion (dissolved in broth)
2 Cloves Garlic Minced
1 tbsp Butter
Directions:
In a large pot on medium high heat, melt butter and toss minced garlic until slightly golden. Remove from pot. Add rice, coconut milk, broth and beans. Stir Cook uncovered until the liquid evaporates. Cover, low the stove temperature to medium and cook for 12 minutes. Stir the rice first with a large spoon and then with a fork to separate the grains. Cook for another 15-20 minutes until grains are soft. Serve as a side and enjoy!

Total Cook Time: 30 minutes

Rice and Beans with Coconut Milk Recipe, simple comfort food, this is the marriage of a classic Southern favorite with a hint of Caribbean flair! #rice #beans #coconut #Southernfood #Caribbeanfood #comfortfood


11/24/13

Fresh Cherries and Hibiscus Holiday Sauce Recipe

Fresh Cherries and Hibiscus Holiday Sauce Recipe, a twist on a classic. Cherries and Hibiscus take the center stage this holiday . Sweet, Tart and Crisp as cranberries, cherries are available all year long and the hibiscus gives this sauce an unexpected but delicious touch #holidayfood #sidedishes #cherries #hibiscus
Hola Amigos: Today I'm mixing it a little bit and sharing with you a twist on side dish eaten by all throughout the holiday season, Cranberry Sauce. This year since I'm not hosting any of the holidays for family and friends, just my guys I get creative freedom when it comes to dishes and do things outside the can.
Fresh Cherries and Hibiscus Holiday Sauce Recipe, If you love cherries why not having them all year long, this vibrantly red sweet and tart sauce is as bursting with flavor and it's done in just a few minutes. #holidayfood #cherries #hibiscus #sidedishes
We only serve or eat cranberry sauce of juice when we have guests or we are sick, lol. This time of the year coincides with summer in my country so we instead of cranberry juice we have Hibiscus Cooler or "Saril" very popular drink around the holidays there. As refreshing and vibrant colored as Cranberry Juice Cocktail only a bit spicy since we add ginger to the infusion! Anyway, it is this Hibiscus Cooler concentrate infusion what I have used to prepare the base of this sauce.

It's not only good by itself, but goes great with ice cream, cake, pancakes anywhere where you use sauce you could use my plain Hibiscus Sauce.

To make it more festive and to resemble the whole cranberry sauce thing, I made a little cherry reduction with some sweet Moscato and mixed it all up!

The result made me skip dinner because I just got a bowl of my favorite ice cream and pour this still warm over it and at it all! Oh my guys! this stuff is addictive!
Fresh Cherries and Hibiscus Holiday Sauce Recipe, Sweet Tart Delicious just no cranberries but cherries and exotic hibiscus! Give this sauce a try this holiday and it will become one of your favorite side dishes! #holidayfood #sidedish #cherries #hibiscus

You can taste the sweetness and tartness of the hibiscus with notes of ginger and a bit of the Moscato on every cherry bite! yumm
Fresh Cherries and hibiscus Holiday Sauce, an alternative to the good ol' Cranberries is this delicious sweet and tart sauce. Vibrantly red and crisp in taste, give this new dish a try this holiday season! #holidayfood #cherrysauce #hibiscus #sidedish

I made enough of the hibiscus sauce to use for future recipes and this particular combination makes about 1 1/2 cup of goodness to have with your turkey or ham.
Thank you so much for visiting the blog today! I hope you enjoy this recipe a little bit our of the ordinary but delicious and easy to make. Remember my friends, everything tastes better with a Pinch of Love!

Besitos,
Lizy
Cherry and Hibiscus Holiday Sauce
Ingredients
For the Hibiscus Infusion and Sauce
1 Cup Hibiscus Flowers
6 Cups Water
1 Inch piece Ginger, peeled
1/2 Cup Corn Syrup
8 TBSP Sugar
1/4 Cup Fresh Orange Juice
2 TBSP Cornstarch
Directions:
In a large saucepan, bring 6 cups water to a rapid boil. Add hibiscus flowers, remove from heat and cover with a lid for about 20 to 30 minutes.
Using a large colander, separate the infusion from the flowers, but do not discard the flowers. They will be use to prepare something delicious soon.
Add 2 cups of the infusion, ginger, corn syrup and sugar to saucepan on medium high heat, stirring until sugar is dissolved.
Combine orange juice and cornstarch and add it to the infusion mix, continue cooking until the mix begins to boil, reduce heat at cook for abut 5 more minutes until the sauce coats a spoon. It will thicken a bit more as it cools.Remove and discard  ginger piece and  remove the sauce  from heat.
For the Cherries
1 Cup Fresh Cherries (could be frozen too), pitted
4 TBSP Moscato wine
1/2 tsp Orange Zest
In a small hot saucepan, add wine, cook for about 1 minute until the alcohol evaporates. Add cherries and orange zest. Cook until  the wine reduces to almost nothing, about 8 minutes. 
Add Hibiscus sauce to the fresh cherries, mix until everything is well blended. Serve and Enjoy!

Prep Time   20 minutes                           Cook Time 13 minutes                            Serves 2 Cups

Sharing my Delicious Creations at these Fabulous Parties:
The Chicken ChickUnder the Table and DreamingCoastal CharmBetween Naps on the PorchThe Plaid and Paisley KitchenCooking for the Seven DwarfsA Pinch of JoyCreate with JoyThe Tumbleweed ContessaKathe with an EFeeding BigHome Stories A to ZHun...what's for dinner?Our Table for SevenThe View from 510Mandy's Recipe BoxNap-Time CreationsChef in TrainingPint Sized BakerLady Behind the CurtainDucks'n a RowFluster BusterThe Taylor HouseGinger Snap CraftsDiana RamblesSweet HauteJuggling Real Food and Real LifeMy Turn (for Us)Craft DictatorTatertots and JelloRain on a Tin RoofHuckleberry LoveCraft-O-ManiacSkip to my LouSay Not Sweet AnneAlderberry HillBoogieboard CottageMad in CraftsFrugality GalCarrie This HomeSmart School HouseKleinworth & coHomemade GingerMemories by the MileAll She CooksKitchen Meets GirlMy Girlish WhimsPink Box RecipeThe Best Blog RecipesArtsy Fartsy MamaCraft DictatorSweet Haute

11/18/13

Bacon and Cheese Cornbread Recipe

Bacon and Cheese Corn Bread Recipe, Bacon Cheese and Spicy Chipotle bring this humble side dish to the spotlight! Watch out turkey here comes the #Cornbread to remember #cornbradrecipe #holidad
Hola Amigos! For the next couple of weeks it's most likely we will be eating a lot of  corn bread! All kinds of cornbread, some spicy, some sweet, some that are hard as a rock and best fed to the birdies in the yard, corn bead in  stuffing, in muffins you name it! This is my super easy and savory recipe with a twist from all the other corn breads you will have these season.
Bacon and Cheese Cornbread Recipe, Bacon and Cheese come together in this delicious twist of your traditional classic #cornbread #cornbreadrecipe #holidayrecipe

There is no flour measuring, no creaming of the corn or using the can stuff, just mix a few ingredients, most of them in your pantry at this moment, bake and enjoy.
Bcon and Cheese Cornbread Recipe, they say everything is better with bacon and cheese and that is the case for sure with these savory cornbread, with a hint of chipotle this will be your go to recipe for this holiday season #cornbread #cornbreadrecipe Holidayfood

It has the things my guys love to no end, bacon and cheese! I added the things I love a bit of smokiness spicy and broccoli! I know it's different, but so good!...believe me when I say this was one veggie that wasn't picked out of the plate like it happens almost on regular basis here by my little one

Give this Corn Bread a try and mix in the elements you love the most, if you are not a fan of broccoli, leave it out and substitute it with your favorite one or add corn! This is a very flexible recipe and that's what I love about it, gives you the foundation for you to do it your way and make it your own.

Thank you for your visit today, I hope you include this quick recipe as one of the many holiday dishes you will have this season! Remember my friends, everything tastes better with a Pinch of Love!
Bacon and Cheese Cornbread Recipe, Savory Cornbread with our favorite flavors of cheese, bacon and a bit of spice for that extra kick #cornbread #cornbredrecipe #holiday


Besitos,
Lizy

Bacon and Cheese Cornbread Recipe
Ingredients:
2 (8.5 oz) Jiffy Corn Muffin Mix
1 (8 oz) Package Cottage Cheese
1 Cup Cheddar Cheese
1 TBSP Chipotle in Adobo Sauce
4 Eggs, beaten
4 Strips of Bacon, cooked and crumbled
1 (8 oz) Package Frozen Broccoli 
1 Small onion, chopped 
1/2 Cup Butter + 1 TBSP extra
Directions:
Pre-heat oven at 350 degrees. Melt butter in a 9 x 13 inch pan. 
In a medium skillet melt 1 TBSP butter and saute onion until transparent. Remove from skillet.
Mix all the ingredients and add saute onions. Add this mix to the previously buttered baking pan. Bake for 45 minutes until toothpick comes out clean. Serve warm and Enjoy!

Prep Time 5 minutes                                                                 Bake Time 45 Minutes                          

Sharing my Savory Corn Bread Recipe at these Fabulous Parties:
The Plaid and Paisley KitchenBetween Naps on the PorchFeeding BigWatch Out, Martha!A Southern FairytaleThe Gunny SackOur Table for SevenHun...What's for Dinner?Chef In TrainingHome Stories A to ZNap Time CreationsMandy's Recipe BoxSugar Bee CraftsCozy Little HouseGinger Snap CraftsMy Sweet MissionLady Behind the CurtainA Bright and Beautiful LifeGina's Craft CornerSweet HauteThe Brambleberry CottageLamberts LatelyThe Mandatoy MoochWhat's Cooking Love?Katherine's CornerThe Crafty BlogstalkerSaving 4 SxA Glimpse InsideMade in a DaySimply Dream and CreateConsider me InspiredArtsy Fartsy MamaLiving Well Spending LessGingerly MadeWhite Lights on WednesdayThe Girl CreativeThe Answer is ChocolateBecoming MarthaThe Best Blog RecipesTidy MomFrench Country CottageMy Turn (for Us)Juggling Real Food and Real LifeHome Maid Simple504 MainThe Shabby NestThe Pin JunkieThe Craft DictatorKitchen Fun with my 3 SonsNot Your Ordinary RecipesLiving Better TogetherIn the Kitchen with JennyThe 36th AvenueToday's Creative BlogCheerios and LattesMade from PinterestTwigg StudiosNifty Thrifty ThingsFlamingo ToesLife on Lakeshore DriveI Should be Mopping the FloorsWill Cook for SmilesTiti Crafty2 Crochet HooksMy Mixing SpoonUnder the Table and DreamingThe Chicken ChickCreate with JoyThe Tumbleweed ContessaKathe with an EThe Taylor House

3/23/13

Yuca Frita-Yuca Fries

Hola Amigos! Happy Weekend...this is a make up post for the absence of Quicky Friday yesterday, so I worked really hard trying to find something fun and different for you to enjoy.

I found what I was looking for in a very odd looking root, Yuca! yes,,,if you are tired of your usual french fries or  even sweet potato fries...keep reading, you are going to love these.
Yuca, also known as cassava, manioc or mandioca is a shrub from South America, Africa, Asia and any other tropical weather region. It's root is rich in starch which makes it a main source of carbohydrates. When it's dry and powdery is called Tapioca (I'm sure you have heard and tried this before).

I was happily surprised that one of my favorite restaurants, Bahama Breeze serves them as appetizers under Crisp Yuka Fries (this spelling is actually the name of a Mammoth from Yukatia, a whole different thing, but it sell I guess, lol). So if you happen to be at a Bahama Breeze, after reading this post perhaps you'll feel more comfortable ordering them.

This is a Pic of Crisp Yuka Fries from Bahama Breeze

The location of the restaurant is quite far from where I live, so since I like them so much I made my own batch as I'm showing you here so you can also make them at home if  you see this funny looking root at your local market.

Yuca Frita- Yuca Fries

1-2 Yuca Roots
oil for frying 
salt, pepper or lemon pepper to taste.
First you need to take a good look at your yuca so you can assess  where to cut it in chunks, you know, 3 or 4 chunks out of one, pretty much the same thing you do when you have to cut a potato or a squash.

Once they are cut, peel the thick skin until they are all white, again, just as you would do with a potato.
(I went and cleaned these chunks a bit more after this pic)

Drop them in a large pot with salt and boil them until they are soft but still somewhat firm (imagine you are making a potato salad and not mashed) about 20 minutes.
Remove from heat and drain them, let them dry on paper towel for a minute or 2, cut them in little chunks while your heating up the oil in your fryer.

  Fry them until they are crisp and golden brown.Sprinkle them with salt, or if you want a little bit of pepper or lemon pepper to kick them up a notch.

Listo! 
They are so good! As a snack by themselves with some ketchup if you want.

As a side dish with your hamburgers
or instead of hash browns for breakfast

They are addictive I tell you...if my picky 4 yo loves them you would too!
Hope you enjoyed this post and give my Yuca Fries a try this weekend. Remember, everything tastes better with a Pinch of Love!

Besitos,
Lizy

Sharing a tropical snack at these Fabulous Parties:
Spatulas on Parade